Four Easy Spring Nail Tutorials Featuring Nails.INC
Let’s face it, overall, self-isolation is tough. However, there are some perks – and having the time to pamper and preen yourself is definitely one of them. That’s why we’ve included a beautiful
About Your Second Sneak
Before we get to that though, here’s a quick overview of what you can expect from your nail polish. Boasting a soft pink pigment with cool undertones,
Better yet, it features Nails.INC’s iconic wide brush (which makes it so easy to apply and allows you to achieve professional-looking results effortlessly) and has a really long-lasting, full-coverage formula. Okay, onto your tutorials.
Four Spring Nail Tutorials
You’re no doubt dying to give yourself a manicure now – and we all know that a good pamper session can do wonders for our mood. So, with no further ado, here are four looks for you to try.
For all of the below tutorials you should start by buffing and filing your nails, then apply a base layer. I’d recommend the Nails.INC Nailpure Base Coat. You’ll also need a top coat. The NARS Cosmetics Nail Polish Top Coat will do the job nicely. Ready? Let’s manicure!
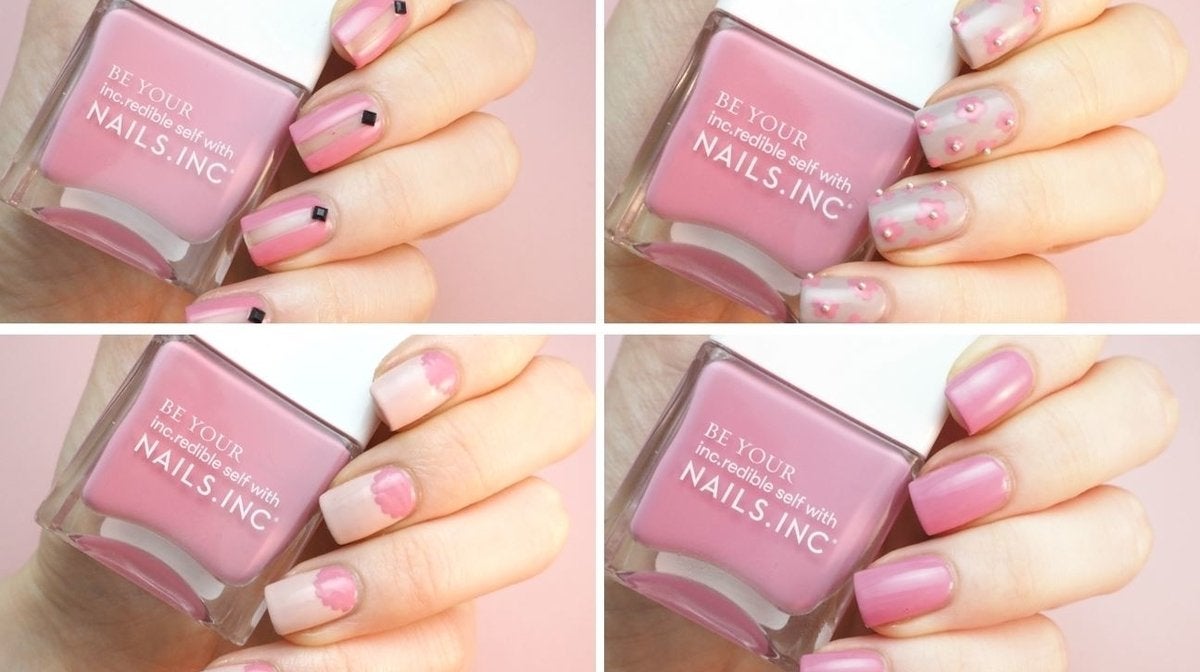
1. Your Spring Flowers Design
We said that we were bringing the outside in this month - and now you can flaunt spring blooms on your nails too with this tutorial.
Apply a coat of light grey nail polish onto each nail, then apply a second coat. If you don’t have one yet, I’d suggest using Leighton Denny Zero Gravity Nail Varnish. Dip your nail dotter (if you don’t have one yet, you can buy one on amazon) into your new Nails.INC polish, then draw five dots in a circle to create a flower. Repeat four to five times on each nail. - Add a top coat onto all of your nails.
Apply a small, round, silver nail decal (also available from amazon) to the centres of your flowers. - Allow to dry and admire your floral manicure!
2. A Scalloped Moon
Apply a coat of light pink nail polish onto each nail, then apply a second coat. If you don’t have one yet, I’d suggest using the Nails.INC Fashion Fix Vintage Tee Nail Polish. - Dip your nail dotter into your new Nails.INC polish, then draw an arch of dots from the bottom left corner of your cuticle, up to 1/3 of your nail, and back down towards the bottom right corner of your cuticle.
- Fill in the arch.
- Add a top coat onto all of your nails.
3. The Fashion-Statement Look
Who said that you couldn’t look nice whilst self-isolating? These Instagram-worthy nails are a great way of testing your skills as a manicurist.
- Stick a strip of tape perpendicularly down the centre of your nail.
- Apply a coat of your Nails.INC polish onto each nail, then apply a second coat.
- Allow to dry, then peel off the tape.
Apply a small black diamond nail sticker (again, have a look on amazon) along the clear strip you’ve now created. Towards the cuticle looks best.
4. A Summery Pink
Of course, you can’t go wrong by just painting your entire nails with this stunning, summery hue!
- Apply a coat of light pink nail polish onto each nail, then add a second coat.
- Add a top coat onto all of your nails. Simple yet elegant!
Give these four spring nail tutorials a try and share your pictures with us using #GlossyAtHome. We’d love to see your designs!
Subscribe To GLOSSYBOX
To receive this Nails.INC nail polish, as well as four other awakening and nourishing products, order your ‘Blossom’ GLOSSYBOX now!


